So, I didn't play with touchpad too much after installing Kali 2.0 on my Acer C720 Chromebook (see previous post). It turns out that the touchpad sensitivity to fingers is pretty high by default, which means that it doesn't always register finger movements and taps. There is a fix to this in the synaptics settings, and there a few ways to get to it.
First, the command synclient will show all of the related settings. Type it into a command line and see. The settings that control sensitivity are "FingerHigh" and "FingerLow". By default, FingerLow is set to 25 and FingerHigh is set to 30. So, use the command:
root@pc:~# synclient | grep -e 'Finger'
This will a handful of settings, including FingerHigh and FingerLow. To temporarily change them, use the command synclient <variable>=<value>.
root@pc:~# synclient FingerLow=6
root@pc:~# synclient FingerHigh=10
If you try to set FingerHigh=10 before moving FingerLow to 6, then the system will complain. That is because you are trying to set the "high" value (30->10) lower than the "low" value (25). So change low to 6, then high to 10.
Try other values and see if they work better. Once you have found good values, make them permanent by adding them to the /usr/share/X11/xorg.conf.d/50-synaptics.conf file.
Add the following section, or just the missing lines if it is already there:
Section "InputClass"
Identifier "touchpad catchall"
Driver "synaptics"
MatchIsTouchpad "on"
MatchDevicePath "/dev/input/event*"
Option "FingerLow" "10"
Option "FingerHigh" "16"
EndSection
My file already had the first three lines, so I just had to insert:
MatchDevicePath "/dev/input/event*"
Option "FingerLow" "10"
Option "FingerHigh" "16"
After that, restart X11. I just rebooted the system. Don't forget to put the "*" at the end of the MatchDevicePath line!
Thursday, September 17, 2015

Thursday, August 13, 2015
Kali 2.0 x64 on Acer c720
Kali 2.0 came out a few days ago, so I wanted to install it and see if the touchpad and suspend quirks had been worked out for the Acer c720. See previous posts to see how to replace the c720 firmware or install an alternate OS.
I downloaded the Kali 2.0 x64 version and created a bootable USB using Rufus 2.2. I then installed it on the Acer by hitting escape at boot to bring up a boot menu. I selected the USB drive and then the install option. I did not use the graphical install.
There was one problem during install where it complained that it could not mount the CDROM (or a similar error). The fix was simply to remove the USB drive, reinsert it, wait a second for it to initialize, and then tell the scrip to try and mount it again. It was clear sailing after that.
The install went smoothly. I was able to suspend using the power button, but closing the lid still does not suspend. Resume worked fine. However, when shutting down, there was an error compaining about ehci-pci port resume error. It just kept going, and I had to shutdown by holding the power button.
I tried the old fixes for sound and ehci with a script in the sleep.d directory, but that didn't seem to do anything. I then modified the grub file in /etc/default/grub.
I changed
GRUB_CMDLINE_LINUX_DEFAULT="quiet"
to
GRUB_CMDLINE_LINUX_DEFAULT="quiet modprobe.blacklist=ehci_hcd,ehci_pci"
Then, I had to rebuild using
# update-grub
# update-grub2
This seemed to resolve the error after suspend, but I haven't tested it with bluetooth or usb devices yet. Also, suspend using the lid seems to work now too. I'm not sure why it didn't before. I might have updated a power setting that got it to work.
I downloaded the Kali 2.0 x64 version and created a bootable USB using Rufus 2.2. I then installed it on the Acer by hitting escape at boot to bring up a boot menu. I selected the USB drive and then the install option. I did not use the graphical install.
There was one problem during install where it complained that it could not mount the CDROM (or a similar error). The fix was simply to remove the USB drive, reinsert it, wait a second for it to initialize, and then tell the scrip to try and mount it again. It was clear sailing after that.
The install went smoothly. I was able to suspend using the power button, but closing the lid still does not suspend. Resume worked fine. However, when shutting down, there was an error compaining about ehci-pci port resume error. It just kept going, and I had to shutdown by holding the power button.
I tried the old fixes for sound and ehci with a script in the sleep.d directory, but that didn't seem to do anything. I then modified the grub file in /etc/default/grub.
I changed
GRUB_CMDLINE_LINUX_DEFAULT="quiet"
to
GRUB_CMDLINE_LINUX_DEFAULT="quiet modprobe.blacklist=ehci_hcd,ehci_pci"
Then, I had to rebuild using
# update-grub
# update-grub2
This seemed to resolve the error after suspend, but I haven't tested it with bluetooth or usb devices yet. Also, suspend using the lid seems to work now too. I'm not sure why it didn't before. I might have updated a power setting that got it to work.
Monday, September 1, 2014
Kali 1.09 x64 on Acer c720, Suspend and Touchpad Working!
I finally got both suspend and the touch pad working with kernel 3.14.5, which is in Kali 1.07, 1.08, and 1.09. Long story short, I compiled a custom kernel to fix suspend. I also added four patches for the touchpad. The other patches that have been listed have already been added to the kernel, so they weren't necessary. These are the steps that I took. There may be typos. I tried to capture everything that I did in order.
The kernel patch is here. The four touchpad patches can be downloaded from: https://patchwork.kernel.org/patch/<patch_number>/raw. Replace <patch_number> with the patch number. The patches are:
After getting the five patches, fix the patch to chromeos_laptop.c in the 3074401 and 3074411. Do a global find and replace for 'x86' and replace with 'chrome'. Then, download and install linux-source, linux-headers-3.14-kali1-amd64, and kernel-package.
root@kali:~# apt-get install linux-source linux-headers-3.14-kali1-amd64 kernel-package
Unzip the source in /usr/src.
root@kali:/usr/src# tar xpf linux-source-3.14.tar.xz
Go to the source root director and patch the Kali patches.
root@kali:/usr/src/linux-source-3.14# xz -dc ../linux-patch-3.14-rt.patch.xz | patch -p1
Patch the five patches. Replace <patch> with the path to the patch. It is easiest if they are copied to the source root directory.
root@kali:/usr/src/linux-source-3.14# patch -p1 <patch>
It's time to build. This took around 3-4 hours on the chromebook. Copy in the config from boot and Module.symvers from the linux-headers. Then compile. Here are the commands that I used.
root@kali:/usr/src/linux-source-3.14# cp /boot/config-3.14-kali1-amd64 .config
root@kali:/usr/src/linux-source-3.14# cp /usr/src/linux-headers-3.14-kali1-amd64/Module.symvers .
root@kali:/usr/src/linux-source-3.14# make-kpkg clean
root@kali:/usr/src/linux-source-3.14# fakeroot make-kpkg --initrd kernel_image
Wait 3-4 hours... Once it is done, there will be a new .deb file in /usr/src. This is the new kernel. Install it using dpkg.
root@kali:/usr/src# dpkg -install linux-image-3.14.5-rt5_3.14.5-rt5-10.00.Custom_amd64.deb
root@kali:/usr/src/linux-source-3.14# reboot
Ok, now touchpad works, but suspend does not. Fix grub to add a few commands. Change /etc/default/grub so that GRUB_CMDLINE_LINUX_DEFAULT is this:
GRUB_CMDLINE_LINUX_DEFAULT="quite splash tpm_tis.force=1 tpm_tis.interrupts=0 modprobe.blacklist=ehci+hcd,ehci_pci nmi_watchdog=0"
Then, rebuild grub with the update-grub command. Reboot. Suspend works via power button, but not lid close.
root@kali:~# update-grub
root@kali:~# reboot
Next step is to tweak touchpad settings and try to figure out why lid close doesn't trigger suspend. It locks the screen, so I know that the lid close event is registered.
The kernel patch is here. The four touchpad patches can be downloaded from: https://patchwork.kernel.org/patch/<patch_number>/raw. Replace <patch_number> with the patch number. The patches are:
After getting the five patches, fix the patch to chromeos_laptop.c in the 3074401 and 3074411. Do a global find and replace for 'x86' and replace with 'chrome'. Then, download and install linux-source, linux-headers-3.14-kali1-amd64, and kernel-package.
root@kali:~# apt-get install linux-source linux-headers-3.14-kali1-amd64 kernel-package
Unzip the source in /usr/src.
root@kali:/usr/src# tar xpf linux-source-3.14.tar.xz
Go to the source root director and patch the Kali patches.
root@kali:/usr/src/linux-source-3.14# xz -dc ../linux-patch-3.14-rt.patch.xz | patch -p1
Patch the five patches. Replace <patch> with the path to the patch. It is easiest if they are copied to the source root directory.
root@kali:/usr/src/linux-source-3.14# patch -p1 <patch>
It's time to build. This took around 3-4 hours on the chromebook. Copy in the config from boot and Module.symvers from the linux-headers. Then compile. Here are the commands that I used.
root@kali:/usr/src/linux-source-3.14# cp /boot/config-3.14-kali1-amd64 .config
root@kali:/usr/src/linux-source-3.14# cp /usr/src/linux-headers-3.14-kali1-amd64/Module.symvers .
root@kali:/usr/src/linux-source-3.14# make-kpkg clean
root@kali:/usr/src/linux-source-3.14# fakeroot make-kpkg --initrd kernel_image
Wait 3-4 hours... Once it is done, there will be a new .deb file in /usr/src. This is the new kernel. Install it using dpkg.
root@kali:/usr/src# dpkg -install linux-image-3.14.5-rt5_3.14.5-rt5-10.00.Custom_amd64.deb
root@kali:/usr/src/linux-source-3.14# reboot
Ok, now touchpad works, but suspend does not. Fix grub to add a few commands. Change /etc/default/grub so that GRUB_CMDLINE_LINUX_DEFAULT is this:
GRUB_CMDLINE_LINUX_DEFAULT="quite splash tpm_tis.force=1 tpm_tis.interrupts=0 modprobe.blacklist=ehci+hcd,ehci_pci nmi_watchdog=0"
Then, rebuild grub with the update-grub command. Reboot. Suspend works via power button, but not lid close.
root@kali:~# update-grub
root@kali:~# reboot
Next step is to tweak touchpad settings and try to figure out why lid close doesn't trigger suspend. It locks the screen, so I know that the lid close event is registered.
Sunday, June 1, 2014
Install Kali 1.07 x64 on Acer c720 Chromebook
I was pretty happy with Kali on the chromebook, so I wanted to try with a larger SSD. First, I made sure development mode was enabled. This is done by hitting <esc><refresh(F3)><power> at the same time. I hit <ctrl><d> to enable developer mode. The system removed cleared all data. I shut it down and started to take it apart.
I replaced the 16GB SSD with a 64GB SSD following directions here. The SSD is an M.2 format, previously known as NGFF (Next Generation Form Factor). It is not the same as an MSATA. I used this drive. To replace it, basically, remove 13 screws from the bottom, carefully pry the bottom off, remove screw on SSD, replace. I put the screw back on for the ssd, put the cover back on, and booted up.
Of course, Chrome OS wasn't installed so the system asked for restore media. I had created that earlier, so I put in the SD card with the restore image and let Chrome OS install again. Once that was done, I knew the SSD was working fine, so I modified the bios so that it would always boot SeaBIOS. That means I won't have to hit <ctrl><l> to boot into linux at the splash screen.
Before you can modify the bios, you have to remove a write-protect screw from the motherboard. This page has a great picture showing the location of the write-protect screw. It was on pretty tight on my board.
Once the screw is out, I put the case back on (it won't boot because of a switch and a battery-enable screw) and booted to Chrome OS. There, I got a terminal (<ctrl><alt><t>), got a shell (typed 'shell'), and elevated privileges (sudo su). I used a built-in script to modify some flags following the directions here.
I created a Kali usb install drive using unetbootin and the Kali 1.07 x64 iso that I had downloaded. Then I put the usb stick in the chromebook and booted. It went to a UNetbootin start screen. This is where I had to add the boot parameters. Within 30 seconds, hit <tab> to get the boot parameters, and then add 'mem=1536m' to the end of the kernel parameters. I had problems getting the first option, install, to work. Instead, I booted to the live instance and choose "Install Kali Linux" from the "Systems Tools" menu. I had a problem with my WPA2 router, so I set up a 2nd router with open wireless for the install.
From there, it is pretty standard. Once Kali was installed, there are several tweaks to make. Update the system, fix the trackpad, fix suspend, fix sound, maybe others. I'll address these in a future post.
I replaced the 16GB SSD with a 64GB SSD following directions here. The SSD is an M.2 format, previously known as NGFF (Next Generation Form Factor). It is not the same as an MSATA. I used this drive. To replace it, basically, remove 13 screws from the bottom, carefully pry the bottom off, remove screw on SSD, replace. I put the screw back on for the ssd, put the cover back on, and booted up.
Of course, Chrome OS wasn't installed so the system asked for restore media. I had created that earlier, so I put in the SD card with the restore image and let Chrome OS install again. Once that was done, I knew the SSD was working fine, so I modified the bios so that it would always boot SeaBIOS. That means I won't have to hit <ctrl><l> to boot into linux at the splash screen.
Before you can modify the bios, you have to remove a write-protect screw from the motherboard. This page has a great picture showing the location of the write-protect screw. It was on pretty tight on my board.
Once the screw is out, I put the case back on (it won't boot because of a switch and a battery-enable screw) and booted to Chrome OS. There, I got a terminal (<ctrl><alt><t>), got a shell (typed 'shell'), and elevated privileges (sudo su). I used a built-in script to modify some flags following the directions here.
I created a Kali usb install drive using unetbootin and the Kali 1.07 x64 iso that I had downloaded. Then I put the usb stick in the chromebook and booted. It went to a UNetbootin start screen. This is where I had to add the boot parameters. Within 30 seconds, hit <tab> to get the boot parameters, and then add 'mem=1536m' to the end of the kernel parameters. I had problems getting the first option, install, to work. Instead, I booted to the live instance and choose "Install Kali Linux" from the "Systems Tools" menu. I had a problem with my WPA2 router, so I set up a 2nd router with open wireless for the install.
From there, it is pretty standard. Once Kali was installed, there are several tweaks to make. Update the system, fix the trackpad, fix suspend, fix sound, maybe others. I'll address these in a future post.
Thursday, April 17, 2014
Fixing Touchpad on Acer 720p Chromebook for Kali 1.06
I updated my kali 1.05 install to kali 1.06 by using the apt-get dist-upgrade. I ran into a few problems but was able to follow the error message output to fix it. Now I'm ready to patch some kernel drivers to support the touchpad. Specifically
There are good directions here, which also deal with suspend problems. I haven't tried to suspend yet, but I can guess that there may be problems. The script here was set up for Ubuntu 13.10 or newer, so it did not work. It failed trying to download the linux kernel source.
Here's the script for reference.
The trackpad worked, but sporadically. I followed the next part of the directions and had to paste these lines into my /usr/share/X11/xorg.conf.d/50-synaptics.conf file in the "InputClass" section.
Most of the lines were there, so I just had to add:
Well...that was easy. Applications | System Tools | Preferences | System Settings. In that window, click on the Touchpad tab. Check "Enable mouse clicks with touchpad" to enable tap-to-click.
- drivers/platform/x86/chromeos_laptop.c
- drivers/i2c/busses/i2c_designware-pci.c
There are good directions here, which also deal with suspend problems. I haven't tried to suspend yet, but I can guess that there may be problems. The script here was set up for Ubuntu 13.10 or newer, so it did not work. It failed trying to download the linux kernel source.
Here's the script for reference.
# Create a temp directory for our work
tempbuild=`mktemp -d`
cd $tempbuild

# Determine kernel version (with and without Ubuntu-specific suffix)
mykern=${1:-$(uname -r)}
mykernver=linux-$(echo $mykern | cut -d'-' -f 1)

# Install necessary deps to build a kernel
sudo apt-get build-dep -y --no-install-recommends linux-image-$mykern

# Grab Ubuntu kernel source
apt-get source linux-image-$mykern
cd $mykernver

if [ -f drivers/platform/x86/chromeos_laptop.c ]; then
  platform_folder=x86
elif [ -f drivers/platform/chrome/chromeos_laptop.c ]; then
  platform_folder=chrome
fi

# Use Benson Leung's post-Pixel Chromebook patches:
# https://patchwork.kernel.org/bundle/bleung/chromeos-laptop-deferring-and-haswell/
for patch in 3078491 3078481 3074391 3074441 3074421 3074401 3074431 3074411; do
  wget -O - https://patchwork.kernel.org/patch/$patch/raw/ \
  | sed "s/drivers\/platform\/x86\/chromeos_laptop.c/drivers\/platform\/$platform_folder\/chromeos_laptop.c/g" \
  | patch -p1
done

# Need this
cp /usr/src/linux-headers-$mykern/Module.symvers .

# Prep tree
cp /boot/config-$mykern ./.config
make oldconfig
make prepare
make modules_prepare

# Build only the needed directories
make SUBDIRS=drivers/platform/$platform_folder modules
make SUBDIRS=drivers/i2c/busses modules

# switch to using our new chromeos_laptop.ko module
# preserve old as .orig
sudo mv /lib/modules/$mykern/kernel/drivers/platform/$platform_folder/chromeos_laptop.ko /lib/modules/$mykern/kernel/drivers/platform/$platform_folder/chromeos_laptop.ko.orig
sudo cp drivers/platform/$platform_folder/chromeos_laptop.ko /lib/modules/$mykern/kernel/drivers/platform/$platform_folder/

# switch to using our new designware i2c modules
# preserve old as .orig
sudo mv /lib/modules/$mykern/kernel/drivers/i2c/busses/i2c-designware-core.ko /lib/modules/$mykern/kernel/drivers/i2c/busses/i2c-designware-core.ko.orig
sudo mv /lib/modules/$mykern/kernel/drivers/i2c/busses/i2c-designware-pci.ko /lib/modules/$mykern/kernel/drivers/i2c/busses/i2c-designware-pci.ko.orig
sudo mv /lib/modules/$mykern/kernel/drivers/i2c/busses/i2c-designware-platform.ko /lib/modules/$mykern/kernel/drivers/i2c/busses/i2c-designware-platform.ko.orig
sudo cp drivers/i2c/busses/i2c-designware-*.ko /lib/modules/$mykern/kernel/drivers/i2c/busses/
sudo depmod -a $mykern
echo "Finished building Chromebook modules in $tempbuild. Reboot to use them."
I had problems with this, so I basically went through the commands one at a time manually. The tricky part was patching. I have never done this before. When I finished, my chromeos_laptop.c file had some structs inserted inside of other structs. I copy/pasted them outside the structs and then the make command worked. After that, I copied chromeos_laptop.ko, i2c_designware-core.ko, and i2c_designware-pci.ko to the right directories, ran depmod -a 3.12-kali1-amd64, and rebooted.The trackpad worked, but sporadically. I followed the next part of the directions and had to paste these lines into my /usr/share/X11/xorg.conf.d/50-synaptics.conf file in the "InputClass" section.
Section "InputClass"
        Identifier "touchpad catchall"
        Driver "synaptics"
        MatchIsTouchpad "on"
        MatchDevicePath "/dev/input/event*"
        Option "FingerLow" "10"
        Option "FingerHigh" "16"
EndSection
Most of the lines were there, so I just had to add:
        MatchDevicePath "/dev/input/event*"
        Option "FingerLow" "10"
        Option "FingerHigh" "16"
Now, I have to figure out how to get tap-to-click to work. Currently, I have to click the touchpad to get right and left clicks.
Well...that was easy. Applications | System Tools | Preferences | System Settings. In that window, click on the Touchpad tab. Check "Enable mouse clicks with touchpad" to enable tap-to-click.
Tuesday, April 15, 2014
Kali Screen Resolution on Acer c720 Chromebook
I installed kali 1.05 on my Chromebook and had two issues. The first is known: the touchpad drivers aren't installed. The second was a slightly off screen resolution. The fix was simply to go to System Tools | Preferences | System Settings. Select Displays. My resolution was set to 1368 x 768. There was another option for 1366 x 768. I selected that, and the screen was fine.
Next step, try to compile touchpad drivers.
Next step, try to compile touchpad drivers.
Install Kali 1.05 x64 on Acer Chromebook c720p
I picked up a refurbished Acer c720 Chromebook for $150. My goal was to install Kali on it. I heard that it was a fast (relatively) machine and the price was right. I've always run Kali in virtual machines, and I thought that it would be nice to have it on actual hardware for a change. This machine is so cheap that I don't mind if it gets trashed.
My first decision was to decide if I was going to use chrouton (runs Ubuntu and some others using a chroot environment) or install it directly. This (and recent) models of chromebook support a legacy bios that allows you to boot from the usb. That makes it a lot easier.
I decided to wipe out the 16Gb ssd, but first I made a backup image of chrome. To do this, use chrome://imageburner in the browser with a 4Gb usb/SD card.
Then I followed the directions here to enable developer mode and boot the usb. I used kali 1.05 because 1.06 is still downloading, and I didn't feel like waiting. To create a bootable usb, I used the kali 1.05 iso file with unetbootin.
I set up developer mode per the directions and booted. I hit <ctrl-l> at the splash screen (legacy?) and it booted off the usb. The trick here was to edit the boot options and add the parameter 'mem=1536m' at the end! Without that, it would fail to boot kali.
I booted the live image and then installed from there. I had a problem connecting to my wireless network until I unhid the SSID. After installing, I rebooted. I didn't hit <ctrl-l> at the developer splash screen, which takes you to a different splash screen saying that the chrome installation is corrupt.
Just reboot and hit <ctrl-l> at the developer mode screen!
There are a couple of issues that I need to sort out.
My first decision was to decide if I was going to use chrouton (runs Ubuntu and some others using a chroot environment) or install it directly. This (and recent) models of chromebook support a legacy bios that allows you to boot from the usb. That makes it a lot easier.
I decided to wipe out the 16Gb ssd, but first I made a backup image of chrome. To do this, use chrome://imageburner in the browser with a 4Gb usb/SD card.
Then I followed the directions here to enable developer mode and boot the usb. I used kali 1.05 because 1.06 is still downloading, and I didn't feel like waiting. To create a bootable usb, I used the kali 1.05 iso file with unetbootin.
I set up developer mode per the directions and booted. I hit <ctrl-l> at the splash screen (legacy?) and it booted off the usb. The trick here was to edit the boot options and add the parameter 'mem=1536m' at the end! Without that, it would fail to boot kali.
I booted the live image and then installed from there. I had a problem connecting to my wireless network until I unhid the SSID. After installing, I rebooted. I didn't hit <ctrl-l> at the developer splash screen, which takes you to a different splash screen saying that the chrome installation is corrupt.
Just reboot and hit <ctrl-l> at the developer mode screen!
There are a couple of issues that I need to sort out.
- The touchpad doesn't work. This is a known issue, and it should be possible to compile the correct drivers.
- The screen resolution seems to be a few pixels bigger than the screen, so it pans a little when I get to the edge. I'll have to look into the display drivers and/or screen resolution.
Saturday, April 5, 2014
Installing kismet for ubertooth
I started by following the kismet guide on the getting started page. I already had some of the packages installed, but that was ok. I downloaded the latest kismet manually rather than using wget. Then I followed the directions. kistmet.conf was in /etc/kismet on my kali 1.04 machine.
I haven't used kismet much at all, so the next step was to read the readme for the ubertooth plugin. The readme in in the ubertooth tools source, specifically ./ubertooth-2014-02-R2/host/kismet/plugin-ubertooth.
0. NOT COMPLETE
1. What is Kismet-Ubertooth
2. Caveats
3. Compiling
4. Installing
5. Using
0. NOT COMPLETE
*** THIS CODE IS CURRENTLY NOT COMPLETE ***
What it does:
* Control one (and only one) Ubertooth Zero or Ubertooth One
* Monitor one Bluetooth channel
* Display the LAP of Bluetooth packets
* Determine and display the UAP of Bluetooth packets
* Log to pcap file
What it should be able to do in the future:
* Determine the clock of a target piconets
* Hop along with a target piconet through all channels
* Control more than one Ubertooth Zero or Ubertooth One
* Read pcap files
* Print debug info about packets
1. What is Kismet-Ubertooth
Kismet-Ubertooth is a Kismet plugin which provides Bluetooth support in
Kismet. It relies on the Bluetooth baseband library, libbtbb
(http://libbtbb.sourceforge.net/). Kismet-Ubertooth performs passive
monitoring of Bluetooth networks using the Ubertooth platform
(http://ubertooth.sourceforge.net/).
It CAN NOT BE USED with 802.11 wi-fi cards, it is a completely different
protocol. If you do not have an Ubertooth but have a Bluetooth adapter,
try the btscan plugin instead. It performs active scanning of discoverable
Bluetooth devices. Better yet, build yourself an Ubertooth One.
Kismet-Ubertooth defines the decoders, loggers, and UI controls for
Bluetooth networks in a common fashion, and supports reading and writing
Bluetooth baseband pcap files.
The Bluetooth baseband protocol is the air interface of Bluetooth. It
operates in the 2.4 GHz ISM band. There is a separate interface known as
HCI (Host Controller Interface) that operates between a host computer and
an attached Bluetooth adapter. Kismet-Ubertooth uses special hardware to
directly access the baseband layer. It does not operate at the HCI layer.
Try hcidump if you want to access HCI.
2. Caveats
This code is currently only partially developed and may not provide full
functionality.
This code has only been tested on Linux. This code MAY work on other
platforms, but currently it is only developed with Linux as a target.
3. Compiling
Compiling the Kismet-Ubertooth plugin requires the Kismet source be
installed and configured. The libbtbb library (0.5 or higher) and libusb
(1.0 or higher) must also be installed.
By default, Kismet-Ubertooth expects the Kismet source to be in
/usr/src/kismet; this can be overridden by setting the KIS_SRC_DIR
environment variable:
cd plugin-ubertooth
KIS_SRC_DIR=/home/foo/src/kismet make
4. Installing
Kismet plugins may be installed system-wide in the plugins directory (by
default, /usr/local/lib/kismet/) or in the users home directory
(~/.kismet/plugins).
To install in the system-wide directory:
cd plugin-ubertooth
KIS_SRC_DIR=/home/foo/src/kismet make install
Plugins can be installed in the current users home directory with:
cd plugin-ubertooth
make userinstall
5. Using
Once the plugin is loaded, Kismet will automatically understand and
decode pcap files with the Bluetooth link data.
To capture from an Ubertooth Zero or Ubertooth One, plug in the USB device,
and define a capture source in Kismet using the interface 'ubertooth'. The
device will be automatically detected.
If you have multiple Ubertooth devices connected, Kismet-Ubertooth uses the
first one it finds. Kismet-Ubertooth currently is not capable of using
| The editor is acting pretty crazy now, so this post is done! |
To enable pcap logging, the logfile must be turned on by adding
'pcapbtbb' to the logtypes= line of the kismet.conf.
So after that, I started kismet. That started the server, and eventually it asked for a new interface. I typed in "ubertooth" and gave it the descriptive name "ubertooth". After that, kistmet started listening.
Then, I had my table search for devices. If things work properly, I should see lots of packets with LAP 0x9e8b33.
 |
| Kismet captured 9e8b33! |
Thursday, April 3, 2014
New Toy - Ubertooth One
I felt like exploring and learning some different wireless technologies, so I ordered an Ubertooth One from SparkFun.com. I wanted to try it with Kali because I knew that there would be some tools and maybe even the Ubertooth software. I already had Kali 1.04 (1.05 is released) as a VirtualBox VM, so I fired it up.
I connected the antenna to the Ubertooth One, then plugged it in. My Windows 7 host didn't recognize the usb device, but I didn't expect it to. I connect the device to the VM and looked for ubertooth software.
root@kali-vbox:~# ubertooth-
ubertooth-btle ubertooth-hop ubertooth-specan ubertooth-util
ubertooth-dump ubertooth-lap ubertooth-uap
I ranubertooth-dump and saw a lot of random stuff. I then went to the getting started guide and saw that they suggested running ubertooth-specan-ui, which should give a nice graphical representation of wireless activity. I did not have that program, so I headed to the build guide.
The first thing that I did was to uninstall the current ubertooth software. It was the 2012.10.r1 version. They are currently on 2014-02-R2.
I pretty much followed the directions on the build guide. Install some compile tools and libraries first. I already had gcc and make installed.
root@kali-vbox:~# tar xf pyusb-1.0.0b1.tar.gz
root@kali-vbox:~# cd pyusb-1.0.0b1/
root@kali-vbox:~/pyusb-1.0.0b1# ls
root@kali-vbox:~/pyusb-1.0.0b1# python setup.py install
Then I downloaded libbtbb per the directions, made it, and installed it.
Finally, I downloaded the ubertooth code, made it, and installed it. Then I had the ubertooth-specan-ui binary.
root@kali-vbox:~# ubertooth-
ubertooth-btle ubertooth-dump ubertooth-scan
ubertooth-debug ubertooth-follow ubertooth-specan-ui
ubertooth-dfu ubertooth-rx ubertooth-util
And here's the proof!

The next step will be to build the kismet plugin and try to add it. Kali 1.04 had kismet 2013.03.R1b already installed. It might understand the ubertooth plugin. It will probably be safer to uninstall it and get the latest source code.
I connected the antenna to the Ubertooth One, then plugged it in. My Windows 7 host didn't recognize the usb device, but I didn't expect it to. I connect the device to the VM and looked for ubertooth software.
root@kali-vbox:~# ubertooth-
ubertooth-btle ubertooth-hop ubertooth-specan ubertooth-util
ubertooth-dump ubertooth-lap ubertooth-uap
I ranubertooth-dump and saw a lot of random stuff. I then went to the getting started guide and saw that they suggested running ubertooth-specan-ui, which should give a nice graphical representation of wireless activity. I did not have that program, so I headed to the build guide.
The first thing that I did was to uninstall the current ubertooth software. It was the 2012.10.r1 version. They are currently on 2014-02-R2.
I pretty much followed the directions on the build guide. Install some compile tools and libraries first. I already had gcc and make installed.
#sudo apt-get install cmake libusb-1.0-0-dev make gcc root@kali-vbox:~# tar xf pyusb-1.0.0b1.tar.gz
root@kali-vbox:~# cd pyusb-1.0.0b1/
root@kali-vbox:~/pyusb-1.0.0b1# ls
root@kali-vbox:~/pyusb-1.0.0b1# python setup.py install
Then I downloaded libbtbb per the directions, made it, and installed it.
Finally, I downloaded the ubertooth code, made it, and installed it. Then I had the ubertooth-specan-ui binary.
root@kali-vbox:~# ubertooth-
ubertooth-btle ubertooth-dump ubertooth-scan
ubertooth-debug ubertooth-follow ubertooth-specan-ui
ubertooth-dfu ubertooth-rx ubertooth-util
And here's the proof!
The next step will be to build the kismet plugin and try to add it. Kali 1.04 had kismet 2013.03.R1b already installed. It might understand the ubertooth plugin. It will probably be safer to uninstall it and get the latest source code.
Sunday, March 9, 2014
Webcam on Raspberry Pi
I want to set up a remote webcam using the Raspberry Pi. I installed a fresh copy of Raspian (2014-01-07-wheezy-raspbian.zip) from the Raspberry Pi download page.
Then, I followed the directions here.
First, update the raspberry pi firmware using rpi-update to add support for USB video device class (UVC). I was not sure if this was needed or not. My device already showed up in the usb device list using the lsusb command.
$ sudo apt-get install rpi-update
$ sudo rpi-update
After this is done, reboot. Next, update the OS.
$ sudo apt-get update
$ sudo apt-get upgrade
Then install motion.
$ sudo apt-get install motion
After installation, I noted that it will not start by default. It was disabled via /etc/default/motion. After motion is installed, configure it by editing the /etc/motion/motion.conf file (with elevated privileges). I turned webcam_localhost and control_localhost to off so that I could view the stream and control the camera from a remote host. I enabled motion by editing the
/etc/default/motion file and changing start_motion_daemon to yes.
Then, I was able to start motion.
$ sudo service motion start
I went to another machine and use VLC to open the stream by selecting "Open Network Steam" and putting in "http://<ip_address>:<port>. In my case, the port was the default 8081, and the ip address was the address of the Raspberry Pi.
Unfortunately, I got a video stream that said "UNABLE TO OPEN VIDEO DEVICE." Now I have to figure out why that didn't work.
Then, I followed the directions here.
First, update the raspberry pi firmware using rpi-update to add support for USB video device class (UVC). I was not sure if this was needed or not. My device already showed up in the usb device list using the lsusb command.
$ sudo apt-get install rpi-update
$ sudo rpi-update
After this is done, reboot. Next, update the OS.
$ sudo apt-get update
$ sudo apt-get upgrade
Then install motion.
$ sudo apt-get install motion
After installation, I noted that it will not start by default. It was disabled via /etc/default/motion. After motion is installed, configure it by editing the /etc/motion/motion.conf file (with elevated privileges). I turned webcam_localhost and control_localhost to off so that I could view the stream and control the camera from a remote host. I enabled motion by editing the
/etc/default/motion file and changing start_motion_daemon to yes.
Then, I was able to start motion.
$ sudo service motion start
I went to another machine and use VLC to open the stream by selecting "Open Network Steam" and putting in "http://<ip_address>:<port>. In my case, the port was the default 8081, and the ip address was the address of the Raspberry Pi.
Unfortunately, I got a video stream that said "UNABLE TO OPEN VIDEO DEVICE." Now I have to figure out why that didn't work.
Bluetooth on Raspian
I've had a Raspberry Pi for a while now. I've tried Rapbian, OpenELEC, and Kali. I want to set up a remote webcam using an old webcam, so I just grabbed the 2014-01-07-wheezy-raspbian.zip from here.
The first thing I wanted to do was to get bluetooth working. I followed the instructions here. The steps are pretty simple.
The first thing I wanted to do was to get bluetooth working. I followed the instructions here. The steps are pretty simple.
- sudo apt-get update
- sudo apt-get install -y bluetooth bluez-utils blueman
Then I used this bluetooth adapter: Plugable USB Bluetooth 4.0 Low Energy Micro Adapter. I plugged it in and went to Preferences | Bluetooth Manager. I searched for devices after putting a bluetooth keyboard into discover mode. Once I found it, I hit "+" to trust the device. Then I right clicked on the device and selected "pair." I had to enter a PIN using my existing keyboard, hit enter, then enter that PIN on the bluetooth keyboard and hit enter.
Once it was paired, I trusted it by right clicking on the device and selecting "Trust." Then the Bluetooth Assistant dialog came up and asked if I wanted to connect to "Input Service" or "Don't connect." I selected "Input Service." The device connected and I could finally type.
Next step - get a webcam working.
Sunday, September 29, 2013
Installing and Configuring OpenVPN Access Server
I've used ssh before to connect to my home router and send web traffic through it when I was out on untrusted public networks. I thought that it would be nice to take that to the next step and set up a VPN server at home. That way, I'd be able to connect to my home network securely from the internet. I can also use it to secure my network traffic when on a public wifi connection.
Now that I have an ESXi server up, I thought that I'd try to use a dedicated virtual machine. I searched for existing appliances, and found the OpenVPN Access Server appliance here. The directions for configuring it are here.
There is a great description of what OpenVPN Access Server is on this page.
I configured it using most defaults. I then set up my router to forward TCP traffic on port 443 to the appliance, which I gave a static IP address. The web interface is actually on port 943, but the server will automatically route https requests on port 443 to port 943. There is also a UDP daemon on port 1194.
I was able to connect to the server using my phone and an OpenVPN client. I downloaded the configuration from the server and connected with my username and password.
This was nice, but I'd much rather use certificates (public/private keys), especially because this is exposed to the internet. My next step is to configure the server and clients to use PKI (Public Key Infrastructure).
Now that I have an ESXi server up, I thought that I'd try to use a dedicated virtual machine. I searched for existing appliances, and found the OpenVPN Access Server appliance here. The directions for configuring it are here.
There is a great description of what OpenVPN Access Server is on this page.
OpenVPN Access Server is a full featured SSL VPN software solution that integrates OpenVPN server capabilities, enterprise management capabilities, simplified OpenVPN Connect UI, and OpenVPN Client software packages that accommodate Windows, MAC, and Linux OS environments. OpenVPN Access Server supports a wide range of configurations, including secure and granular remote access to internal network and/ or private cloud network resources and applications with fine-grained access control.It comes with two free licenses, which supports two concurrent connections.
I configured it using most defaults. I then set up my router to forward TCP traffic on port 443 to the appliance, which I gave a static IP address. The web interface is actually on port 943, but the server will automatically route https requests on port 443 to port 943. There is also a UDP daemon on port 1194.
I was able to connect to the server using my phone and an OpenVPN client. I downloaded the configuration from the server and connected with my username and password.
This was nice, but I'd much rather use certificates (public/private keys), especially because this is exposed to the internet. My next step is to configure the server and clients to use PKI (Public Key Infrastructure).
Saturday, August 31, 2013
Software Defined Radio on Raspberry Pi
I've been playing around with this USB dongle for software defined radio. I got it to work in Kali Linux (VM). I was able to send ADS-B packets from the Kali VM to the windows host which was running adsbSCOPE 2.63. I saw that some people have used a Raspberry Pi to receive the signals and rebroadcast over a network, so I wanted to try that next.
I first looked for the rtl-sdr drivers using apt-get in Raspian. Of course, that package wasn't there. Thankfully, there are some simple instructions for getting the source code for the driver and building it here.
Here is what I did.
root@raspberrypi:/home/pi# rtl_adsb | netcat -lp 7000
Then in adsbSCOPE under 'other | Network' menu, I set the network setting to listen to the Raspberry Pi's IP address and port 7000 for the RAW-data-client. I made sure the the RAW-data-client was active under the 'other | Network' menu.
I was receiving packets and displaying aircraft location. Not too many, but that might have to do with the antenna and location that I was receiving from.
I first looked for the rtl-sdr drivers using apt-get in Raspian. Of course, that package wasn't there. Thankfully, there are some simple instructions for getting the source code for the driver and building it here.
Here is what I did.
- Update my version of Raspian. This updates the package lists and then installs any updated packages.
- root@rapberrypi:~# apt-get update
- root@rapberrypi:~# apt-get uprade
- Install packages needed to build packages from source.
- root@rapberrypi:~# apt-get install git
- root@rapberrypi:~# apt-get install cmake
- root@rapberrypi:~# apt-get libusb-1.0-0-dev
- I tried to install build-essential, but it was already installed
- Create a new directory. I used the pi home directory.
- root@rapberrypi:~# cd /home/pi
- root@rapberrypi:/home/pi# mkdir src
- root@rapberrypi:/home/pi# cd src
- Get the source code
- root@rapberrypi:/home/pi/src# git clone git://git.osmocom.org/rtl-sdr.git
- Build and install it
- root@rapberrypi:/home/pi/src# cd rtl-sdr
- root@rapberrypi:/home/pi/src/rtl-sdr# mkdir build
- root@rapberrypi:/home/pi/src/rtl-sdr# cd build
- root@rapberrypi:/home/pi/src/rtl-sdr/build# cmake ../
- root@rapberrypi:/home/pi/src/rtl-sdr/build# make
- root@rapberrypi:/home/pi/src/rtl-sdr/build# make install
- root@rapberrypi:/home/pi/src/rtl-sdr/build# ldconfig
- Test it. I ran rtl_test and then rtl_adsb to see if I got any output.
- root@rapberrypi:/home/pi/src/rtl-sdr/build# rtl_test
Found 1 device(s):
0: ezcap USB 2.0 DVB-T/DAB/FM dongle
ETC... - root@rapberrypi:/home/pi/src/rtl-sdr/build# rtl_adsb
Found 1 device(s):
0: Realtek, RTL2838UHIDIR, SN: 00000001
Using device 0: ezcap USB 2.0 DVB-T/DAB/FM dongle
Found Rafael Micro R820T tuner
Tuner gain set to automatic.
Tuned to 1090000000 Hz.
Sampling at 2000000 Hz.
Exact sample rate is: 2000000.052982 Hz
*aa7b30d2cec4af08045508ad3d47;
ETC...
root@raspberrypi:/home/pi# rtl_adsb | netcat -lp 7000
Then in adsbSCOPE under 'other | Network' menu, I set the network setting to listen to the Raspberry Pi's IP address and port 7000 for the RAW-data-client. I made sure the the RAW-data-client was active under the 'other | Network' menu.
 |
| adsbSCOPE Network Setup Window |
I was receiving packets and displaying aircraft location. Not too many, but that might have to do with the antenna and location that I was receiving from.
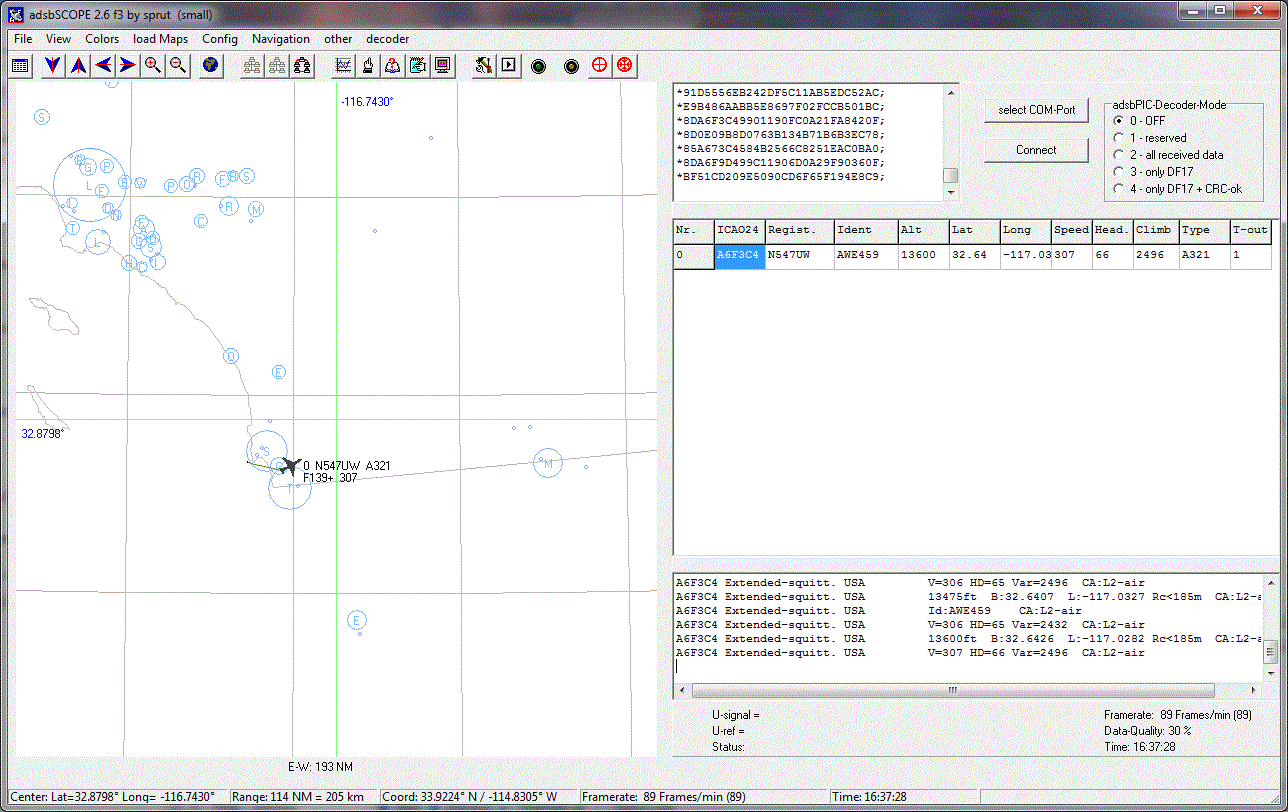 |
| adsbSCOPE Main Window, Decoding Location of One Airplane |
Kali 1.0.4 VirtualBox Guest Additions and Resolutions
I installed Kali 1.0.4 64bit on VirtualBox. After updating it, I installed Guest Additions to get custom resolutions and better mouse support. However, I was only able to get various 4:3 ratio resolutions, and definitely not custom sizes.
The solution is in this post. What I needed to do was to uninstall Guest Additions, then install three packages using apt-get: dkms build-essential linux-headers-amd64.
The command was:
root@kali-vbox:~# apt-get install dkms build-essential linux-headers-amd64
After that, I reinstalled Guest Additions and rebooted. I was able to use any resolution window after that using the normal command:
root@kali-vbox:/media/cdrom# sh ./VBoxLinuxAdditions.run
The solution is in this post. What I needed to do was to uninstall Guest Additions, then install three packages using apt-get: dkms build-essential linux-headers-amd64.
The command was:
root@kali-vbox:~# apt-get install dkms build-essential linux-headers-amd64
After that, I reinstalled Guest Additions and rebooted. I was able to use any resolution window after that using the normal command:
root@kali-vbox:/media/cdrom# sh ./VBoxLinuxAdditions.run
Sunday, August 25, 2013
Software Defined Radio
Every once in a while, I look up information on Automatic Dependent Surveillance-Broadcast (ADS-B). What is that? It is a broadcast from airplanes that gives information about aircraft like their identification, speed, altitude, position, etc. It will be replacing radar as the primary tracking and surveillance tool worldwide. It is already in use by many aircraft.
What is neat (and stupid) is that this information is broadcast in the clear on 1090MHz. So for a while, people have been using satellite receivers and hacking them to pick up the signal, or building their own board, or creating kits. It seems to be pretty popular now with several software decoders and "radar" software to display the information.
I was looking for information again and saw that there was an easier way to receive data now. There are $20 USB dongles for European Digital TV that work as Software Defined Radios (SDR). They have ranges from 24MHz to 1700MHz for the newer tuner (R820T).
I bought one from amazon for $12.95. This is the listing, but the price changes. This one is $19.95, is recommended, and is identical to what I got.
A good place to get started is to google rtl sdr. RTL is the name of the utility drivers for the Realtech RTL2832U receiver. This blog looks good, and I used this page a lot. I also decided to do my dirty work in a Kali (Linux, Debian based) VM because I didn't want to install a bunch of dodgy software on my windows laptop first. It looks like there are some windows programs, but I was particularly interested in gqrx, which is linux based.
To get it to work on Kali, I followed this, which recommended building GNU Radio and gqrx from scratch. I ended installing a fresh version of Kali 1.04, and then just installing gqrx using apt-get. That took care of the dependencies, and it worked fine. It couldn't have been much simpler.
After that I was able to tune in FM radio stations and receive 1090MHz ADSB broadcasts. I downloaded a simple display tool (adsbSCOPE) to verify that I was getting good information. This is windows software, so I ran it on my laptop. I set it to get information from my VM on port 7000, then I used rtl_adsb piped through netcat on the Kali VM to deliver the ADSB data. They were running on the same machine, but this could be distributed. Even to a Raspberry Pi...
The next steps are to get a PAL to F connector adapter so that I can use better antennas, then create some better antennas. This page does a great job of listing the software and antennas that you can use to get ADSB. adsbSCOPE was one of four "radar" softwares listed, with three of the four being free.
One of the other ADSB radar programs is Virtual Radar. I didn't want to try it because it uses Google maps. It is also a web server, so I figured it probably wouldn't work great offline. Many of the installations are published to the internet. To find them, execute this Google search: inurl:”VirtualRadar/GoogleMap.htm”. The second one I looked at had this:

I'm looking forward to getting better antennas and decoding other information. In theory, most transmissions in the 24MHz - 1700MHz range should be receivable with this dongle. There are tricks to shift frequencies so that it can receive even lower frequencies. This should cover AM, FM, ADSB, police, aviation, ADSB, and many others. My next step is NOAA satellite broadcasts, but I'll need to make a better antenna.
What is neat (and stupid) is that this information is broadcast in the clear on 1090MHz. So for a while, people have been using satellite receivers and hacking them to pick up the signal, or building their own board, or creating kits. It seems to be pretty popular now with several software decoders and "radar" software to display the information.
I was looking for information again and saw that there was an easier way to receive data now. There are $20 USB dongles for European Digital TV that work as Software Defined Radios (SDR). They have ranges from 24MHz to 1700MHz for the newer tuner (R820T).
I bought one from amazon for $12.95. This is the listing, but the price changes. This one is $19.95, is recommended, and is identical to what I got.
A good place to get started is to google rtl sdr. RTL is the name of the utility drivers for the Realtech RTL2832U receiver. This blog looks good, and I used this page a lot. I also decided to do my dirty work in a Kali (Linux, Debian based) VM because I didn't want to install a bunch of dodgy software on my windows laptop first. It looks like there are some windows programs, but I was particularly interested in gqrx, which is linux based.
To get it to work on Kali, I followed this, which recommended building GNU Radio and gqrx from scratch. I ended installing a fresh version of Kali 1.04, and then just installing gqrx using apt-get. That took care of the dependencies, and it worked fine. It couldn't have been much simpler.
After that I was able to tune in FM radio stations and receive 1090MHz ADSB broadcasts. I downloaded a simple display tool (adsbSCOPE) to verify that I was getting good information. This is windows software, so I ran it on my laptop. I set it to get information from my VM on port 7000, then I used rtl_adsb piped through netcat on the Kali VM to deliver the ADSB data. They were running on the same machine, but this could be distributed. Even to a Raspberry Pi...
The next steps are to get a PAL to F connector adapter so that I can use better antennas, then create some better antennas. This page does a great job of listing the software and antennas that you can use to get ADSB. adsbSCOPE was one of four "radar" softwares listed, with three of the four being free.
One of the other ADSB radar programs is Virtual Radar. I didn't want to try it because it uses Google maps. It is also a web server, so I figured it probably wouldn't work great offline. Many of the installations are published to the internet. To find them, execute this Google search: inurl:”VirtualRadar/GoogleMap.htm”. The second one I looked at had this:
I'm looking forward to getting better antennas and decoding other information. In theory, most transmissions in the 24MHz - 1700MHz range should be receivable with this dongle. There are tricks to shift frequencies so that it can receive even lower frequencies. This should cover AM, FM, ADSB, police, aviation, ADSB, and many others. My next step is NOAA satellite broadcasts, but I'll need to make a better antenna.
Subscribe to:
Posts (Atom)